A drip cap and a bead of sealant solve the same problem at a window opening in opposite ways, and the drip cap vs caulk decision comes down to that difference. A drip cap is a shedder: it intercepts water running down the wall above and throws it clear of the head, so the water never reaches the joint. Sealant is a seal: it closes a joint water has already reached, and holds only while bonded to both surfaces. One works by geometry and gravity; the other by adhesion.
That difference decides where each belongs: the drip cap at the head, integrated with the weather barrier and cladding; sealant at joints that must move and at terminations a shedder cannot cover. Neither substitutes for the other. A seal cannot replace a missing shedder, because it would then be holding back a stream rather than closing a gap, and a drip cap cannot seal a joint, because a shedder is deliberately open.
The drip cap vs caulk confusion is expensive. A head caulked three times in ten years is usually not a maintenance problem but a missing shedder, and the recurring cost is the symptom. What follows covers choosing, specifying and inspecting the right component, not the causes of leakage — those are covered in why aluminum windows leak.
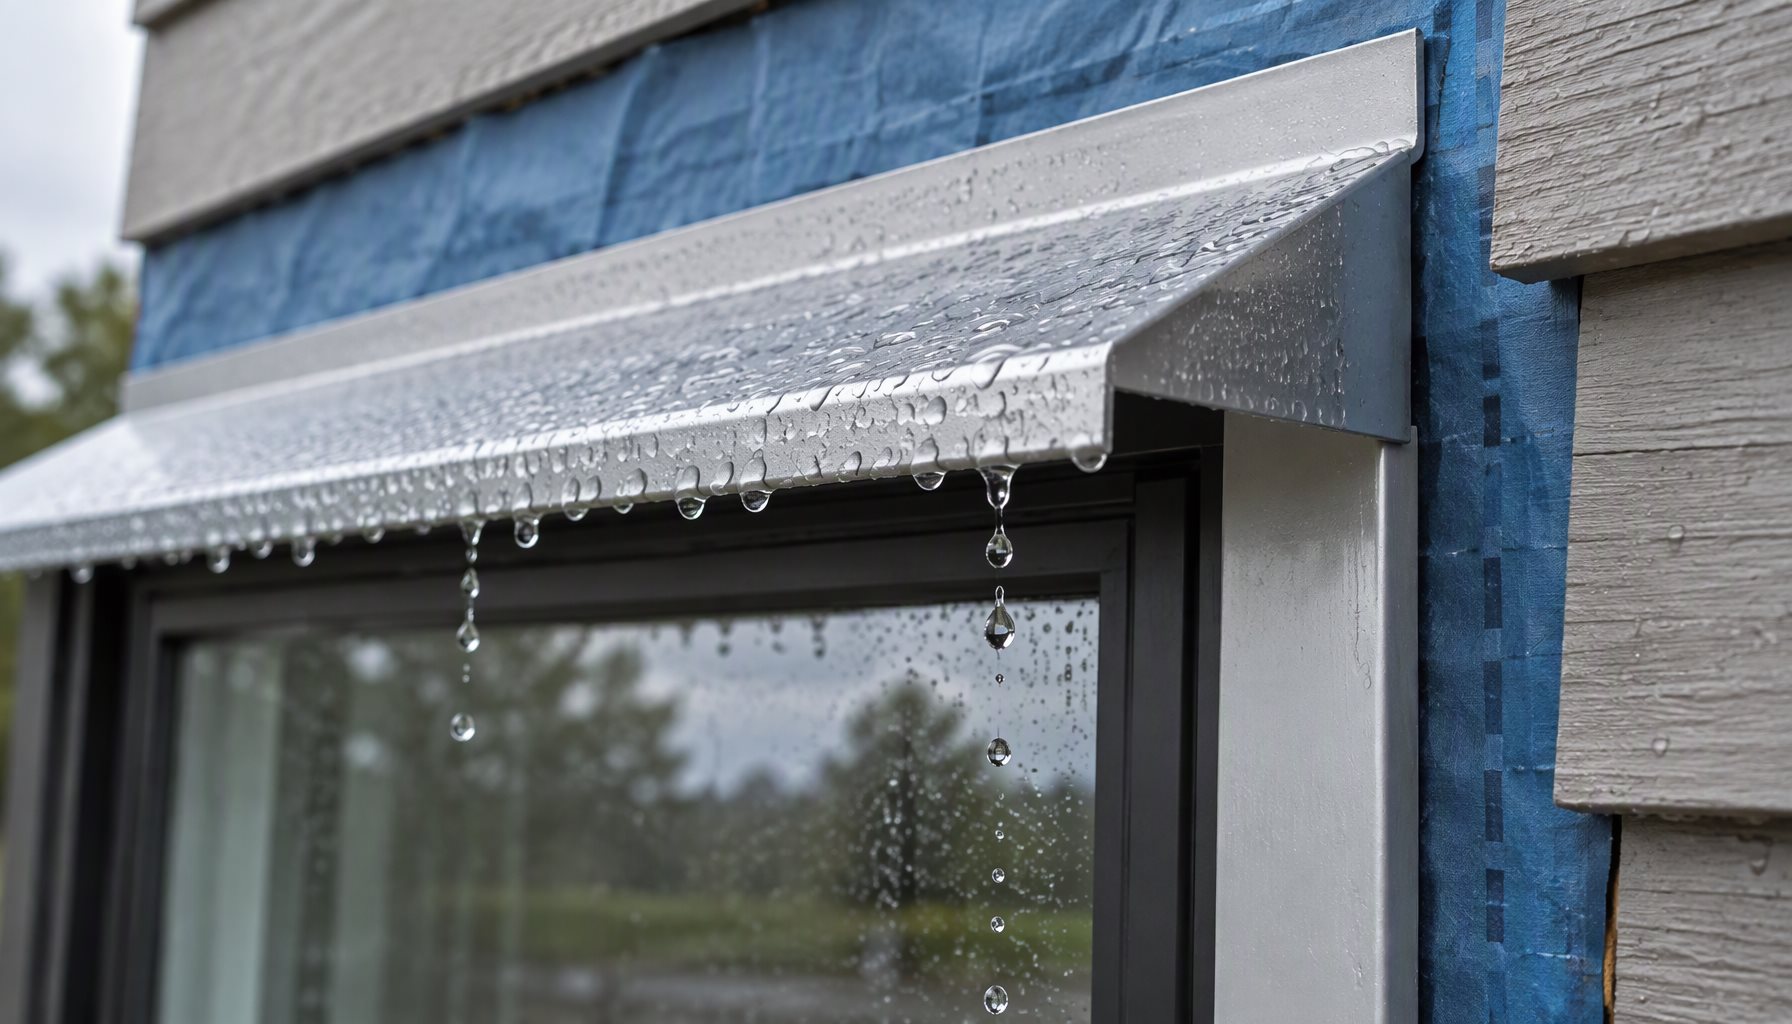
Two Jobs, Two Failure Modes
A drip cap is a formed metal profile, aluminum on most commercial and better residential work, with a sloped top surface, a projection past the face of the frame, and a drip edge standing clear of the wall below. It takes the water that lands on it and discharges it beyond the plane of the opening. It also creates a discontinuity — a break in the path a droplet would otherwise follow from the wall above, across the head joint and into the frame. Water does not climb a discontinuity.
A seal is a joint filler. It bonds to two substrates, accommodates some movement between them, and keeps water out by staying continuous and adhered. It has no slope, projection or drip edge, and needs none, because its job is to close a gap rather than divert a flow. Its performance is a function of adhesion, joint movement, and the environment that degrades both.
A shedder’s performance is fixed at installation; a seal’s begins degrading at installation. That asymmetry is the whole argument, and it is why a design relying on sealant at the head has already scheduled its rework.
The Head Detail
Water reaching a window head arrives from above, from a catchment area many times the width of the joint it drains to, and wind-driven rain is pushed against the facade and driven sideways under the smallest gap.
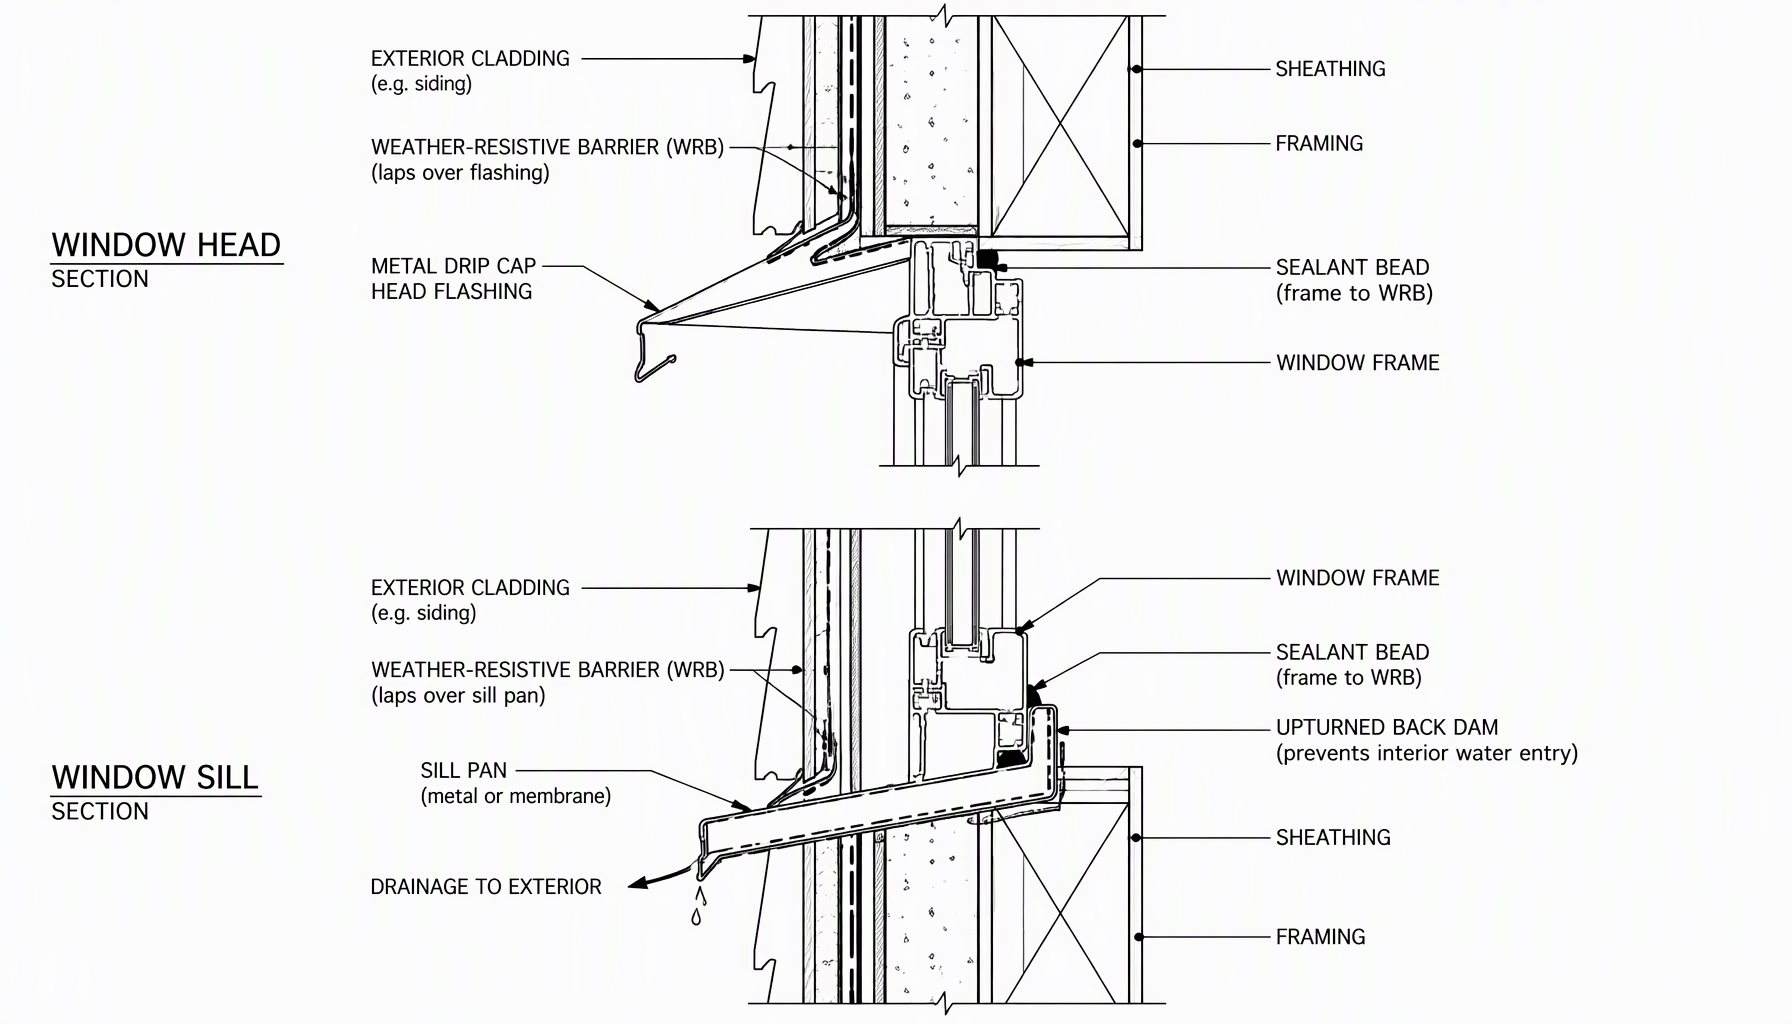
The correct sequence, from the outside in: the weather-resistive barrier below the opening laps over the flashing; the flashing or drip cap is set over that lower layer and turned up at the back; the window is set with its head flange integrated with the flashing; the barrier above laps over the top of the flashing; the cladding goes on last. Every layer laps over the one below, so gravity carries water outward at every interface. A single reversed lap turns the head into a funnel.
Three details decide whether the cap actually sheds:
- Slope. The top surface has to drain. A flat cap holds water until it finds a fastener or a lap.
- Projection and drip edge. The cap must project beyond the face of the frame, with a drip edge standing proud of the wall below. A cap flush with the cladding gives water no way to release clear of the joint; surface tension pulls the bead back against the wall.
- End dams. At each end the flashing has to turn up, or terminate into a wall condition that stops water running sideways off the end and behind the cladding.
Most failures sit at the interface between cap and barrier, which depends on the rough opening being square, correctly dimensioned and detailed in sequence before the window arrives. The window rough opening preparation that makes a head detail work is sequence work, not sealant work.
Why Sealant Gets Used Where a Drip Cap Was Needed
A tube of sealant is cheap, fast and requires no coordination. A drip cap is cheap too — the metal is not the cost — but it requires sequence: barrier, flashing, window, barrier over the flange, cladding. That sequence has to be agreed between trades, and the head is often closed before anyone checks it. On a production schedule the caulk gun is the path of least resistance, and it produces a joint that looks finished.
Then there are the assumptions. A nailing fin or factory head flange is not a drainage detail on its own; a flange sealed to the wall with a bead, no slope and no projection is a seal pretending to be a shedder. An eave or soffit reduces exposure but does not eliminate wind-driven rain, and does nothing for a gable opening. Sealant is fine as a secondary measure at a termination, but not as the primary defense, because it is the only component whose performance is guaranteed to decline. And a head can stay dry for years in a sheltered exposure before it fails in the first storm that drives rain at the right angle.
Sealant ends up where a drip cap was needed because the missing component is invisible after close-in, while the substitute is visible as a neat bead. That is a scheduling problem, not a materials problem.
Drip Cap vs Caulk, Function by Function
| Component | Function and where it goes | Tolerances, failure mode and service life |
|---|---|---|
| Drip cap / head flashing | Shedder — intercepts water running down the wall and throws it clear of the head, creating a discontinuity in the water path. Set over the head, lapped into the weather barrier and under the cladding, projecting past the frame face with a drip edge. | Tolerates water volume, wind-driven rain, UV and freeze-thaw, provided slope and projection are correct. Fails from installation error — reversed lap, flat slope, short projection, missing end dam, unsealed fastener, untreated cut edge. Service life: the wall assembly if installed correctly; the metal is not the limiting factor. |
| Sealant at the head joint | Seal — closes a joint by adhesion, keeping out water that has already reached it. Placed in the joint between frame and wall, at terminations and at joints designed to move. | Tolerates movement within its stated capability, thermal cycling and wetting, for a limited period. Fails at the bond line — adhesion loss, cohesion tear, fatigue, UV and dirt degradation, hidden behind the cladding line. Service life: finite and shorter than the wall; a recurring replacement item. |
| Sill pan with back dam | Collector and shedder — catches water past the window, slopes it out and dams it from the wall cavity. Set under the window at the sill, turned up at the back and ends, draining to the exterior. | Tolerates brief standing water, debris and occasional overflow, provided it drains. Fails as a flat pan, blocked weep, or missing or discontinuous back dam — the pan becomes a tray. Service life: the assembly if it drains; fails early if it does not. |
In the drip cap vs caulk comparison, the asymmetry matters more than any single cell. The shedder’s weak points are installation errors, inspectable before the wall is closed. The seal’s weak point is time, and it cannot be inspected without opening the joint.
The Sill Pan and the Back Dam
The same logic applies at the sill.
A sill pan is a collector and a shedder. It catches water that gets past the window or through the frame, slopes it to the exterior, and discharges it through the cladding or a weep path. A back dam is the upturned rear leg of that pan, and it is a discontinuity in its own right: it stops water running backward into the wall cavity. End dams do the same at the sides. The pan does not have to be watertight in the sense a seal is watertight; it has to drain.
Sealant appears at the sill in two very different roles. As a secondary seal at the corners and at the frame-to-pan interface, it is appropriate. As the primary defense in place of a pan, it is not, and it fails destructively: water that gets past the seal has nowhere to go, so it sits against the frame, the rough opening and the wall assembly. A sealed sill with no slope and no dam is a tray. A pan with a back dam is a drain.
How the Two Fail Differently
Sealant fails at the bond line first. Adhesion loss shows up as a pull-away, a crack, or a bead released from one substrate while still attached to the other. Movement accelerates it: a joint cycling with thermal expansion and wind load fatigues the sealant, and once the bond breaks, water enters behind the bead and travels by capillary action. In a vertical head joint the failure is hidden behind the cladding line, so the first evidence is water inside the wall, not a visible defect.
A metal drip cap fails differently. The material is durable; what fails is the installation or the interface — a reversed lap, a cap installed flat, a projection short of the frame face, a missing end dam, fasteners driven through the face without sealing, cut edges left untreated on a coated product. Coating performance matters at those cut edges and in coastal exposures, which is what AAMA 2605 addresses — see powder-coat durability and preventing aluminum window corrosion. Note the difference in kind: the drip cap’s failures are errors made once, at installation, and correctable before close-in. The seal’s failure is a recurring event with a service interval.
That is why “caulk it again every few years” is not a maintenance plan. It describes a detail missing its shedder, maintained at the owner’s expense for the life of the building.
Specifying Both
A specification that names both components and assigns each its role settles most of the argument before installation begins.
- Head flashing at every exterior opening. Require a sloped head flashing or drip cap with a drip edge projecting beyond the frame face, end dams at both terminations, and a back leg integrated with the weather barrier. Require the lap sequence on the drawings, not in a note.
- Sealant by function, not by brand. Require sealant at joints that move and at terminations, and state that it is not the primary water defense at the head. Where a joint moves, the sealant has to be selected for that movement.
- Sill pan with back dam. Require a sloped pan with a continuous back dam and end dams, draining to the exterior, in the same section as the window so it cannot be value-engineered out.
- Compatibility. Require the sealant, flashing membrane and barrier to be compatible and specified as a system. A sealant that attacks the membrane it bonds to is a failure that starts on day one.
- Testing references. Require water penetration resistance to ASTM E547 and mock-up testing to AAMA 501 where the project calls for it, air leakage to ASTM E283, and structural performance to ASTM E330, then confirm against the certified test data for the assembly.
A laboratory water test runs on a complete assembly with the manufacturer’s intended detail; change the head to a bead of sealant and the rating no longer describes the wall. The quality controls that make a tested assembly repeatable in the field are part of the specification too.
Inspecting the Detail in the Field
Inspect after the flashing and before the cladding.
At the head: confirm a sloped member drains away from the wall; that it projects past the frame face with a drip edge clear of the wall; that the barrier above laps over the flashing and the flashing over the barrier below; that end dams are present; that fastener penetrations are sealed; that cut edges are treated.
At the sill: confirm slope, back dam, end dams and a clear weep path.
At the joints: confirm sealant is present where a joint moves, that joint width and depth suit the sealant, and that substrates are clean and compatible. A bead applied over dust or a wet surface is a bead with a known future.
A hose test at the head can expose a reversed lap, but it is not a rating. Water penetration resistance is established by ASTM E547, and AAMA 501 defines the field procedure where the project requires one.
The practical takeaway is one question asked at the right time: what sheds the water at this head, and what only seals a joint? If the same component is doing both, the detail is wrong, and the cost will show up as a callback rather than a line item.

Frequently Asked Questions
Drip cap vs caulk: does a window need both?
Yes, in different roles. The drip cap sheds water away from the head and keeps the joint dry; sealant closes the joints that must move and the terminations the cap cannot cover. Neither backs up the other.
Can I just caulk the top of a window instead of installing a drip cap?
No. A bead of sealant holds water at the face of the joint and depends on adhesion, so it begins degrading as soon as it cures, and it has no way to discharge the volume of water that reaches a head. Sealant can supplement a head detail, but it cannot replace the shedder.
Where exactly does the drip cap go?
Over the window head, lapped into the weather barrier in shingle fashion and under the cladding, with the drip edge projecting past the frame face. The barrier below laps over the flashing and the barrier above laps over its top, so water always travels outward and downward.
How often should window sealant be replaced?
There is no universal interval; it depends on the sealant, joint movement, exposure and substrate. A predictable replacement cycle usually means the detail relies on a seal where a shedder was needed, and the correct fix is the flashing detail, not a better bead.
What is the difference between a drip cap and head flashing?
Head flashing is the broader term for the water-shedding layer at the head of an opening, including its integration with the weather barrier. A drip cap is the formed profile with a sloped face and projecting drip edge that does the shedding. On many details they are the same piece of metal, but the flashing function includes the laps and end dams around it.
Lansen Windows & Doors manufactures thermally broken aluminum windows, doors, curtain walls and sunrooms in Foshan, Guangdong, and exports to North American importers, contractors and window brands. For project-specific head, sill and flashing details, or to discuss a package, request a project estimate.